Kids Bike Helmet Sizes: Size Chart by Age + Fit Guide
The vast majority of kids wear their helmets incorrectly, and sadly, most parents don’t even realize it. With nearly 20 years of testing and fitting kids’ helmets, we are here to help. We’ve seen the good, the bad, and the ugly over the years, and nothing reinforces the importance of a properly fitted helmet more than seeing a serious injury prevented because of one.
In this article, we’ll walk you through exactly how to find the right size helmet, how to adjust it correctly, and what features to look for when buying.
How do Kids Helmet Sizes Work?
If you’re tempted to skip the measuring and just grab a generic “child” size helmet — don’t.
Kids helmet sizes go by all sorts of names: Toddler, Child, Youth, XS, S, M, and so on. Sizing varies significantly across brands, and a “medium” from one brand may fit completely differently than a “medium” from another.
Instead, focus on your child’s head circumference in centimeters and don’t worry about the size label. We’ll walk you through how to measure correctly below.
Helmet Size Chart by Age (50th percentiles)
These averages are a useful starting point, but true head sizes vary widely from kid to kid. We’ve measured a 3-year-old with a 55cm head and an 8-year-old with a 52cm head. These 50th percentile averages give you a rough starting point, but always measure, never assume.
Helmet Head Circumference By Age
| Age | Girls | Boys | Helmet Page |
|---|---|---|---|
|
Toddlers & Preschoolers - 50th Percentiles (cm) |
|||
| 12 - 18 mo | 45-46.5 | 46-47.6 | Best Toddler Helmets → |
| 2 - 2.5 yr. | 47-48 | 48-49 | |
| 3 - 3.5 yr. | 49 | 49-50 | |
|
Kids Ages 4 to 11 - 50th Percentiles (cm) |
|||
| 4 - 5 yr. | 49.5-50 | 50.5-51 | Best Kids Helmets → |
| 6-8 yr. | 51-53 | 52-54 | |
| 9-11 yr. | 53-54 | 54-55 | |
|
Tweens & Teens - 50th Percentiles (cm) |
|||
| 12+ yr. | 54-54.5 cm | 54-55 | Best Womens Helmets → |
| 14+ yr. (boys) | - | 55-56 | |
Keep in mind that even a helmet in the right size range may sit awkwardly if the shape doesn’t match your child’s head — we call out narrow and wide-fitting helmets in our Best Kids Bike Helmets and Best Toddler Bike Helmets reviews.
How Should a Kids Bike Helmet Fit?
From measuring to final adjustments, these six steps will walk you through everything you need to get your child’s helmet fitting correctly and staying that way.
Visual learner? Let us show you the step-by-step process of properly sizing and adjusting your child bike helmet in our video demonstration. Missed a step? Not to worry, we’ve outlined all of the steps shown in this video below.
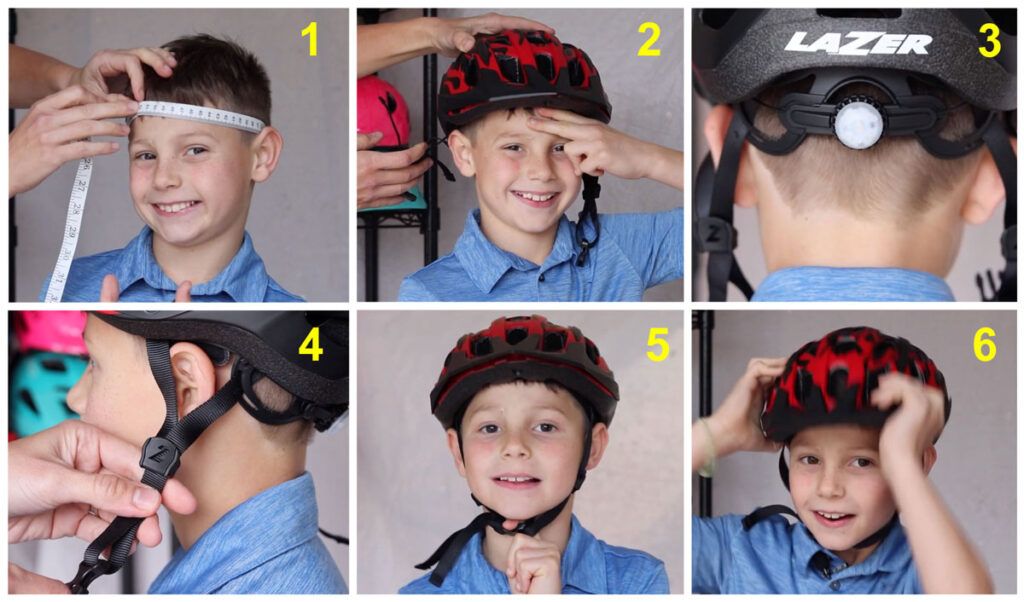
6 Easy Steps to a Perfect Helmet Fit
(1) Measure your Child’s Head
You can’t get a good fit without the right size — so start here.
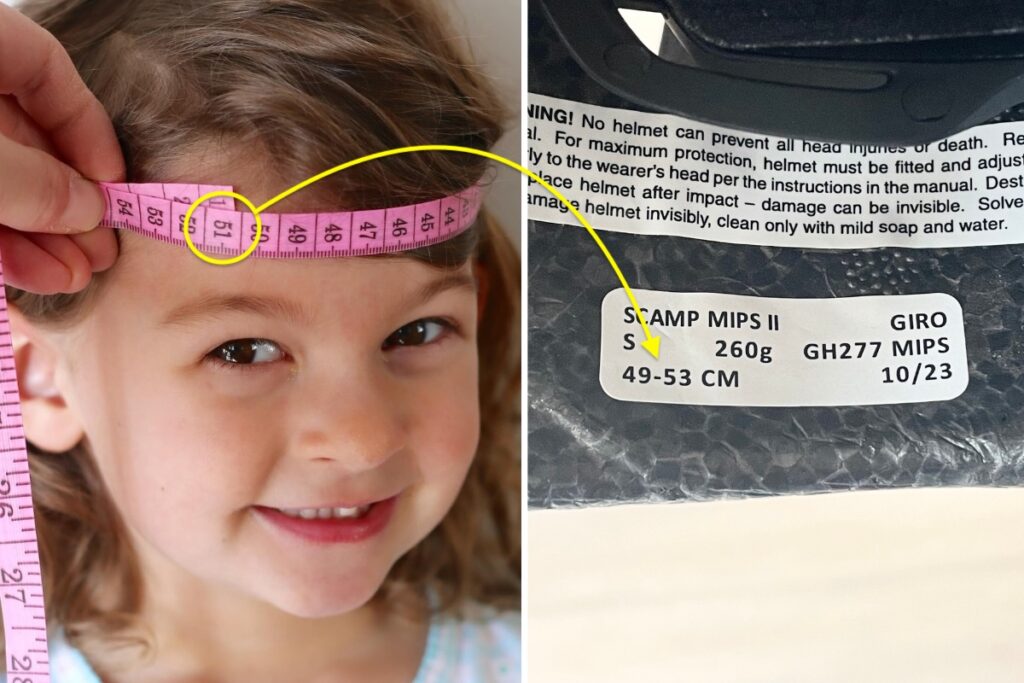
Using a soft tape measure, wrap it around the widest part of your child’s head, about an inch above the eyebrows. That number in centimeters is what you’ll match to the helmet’s listed size range.
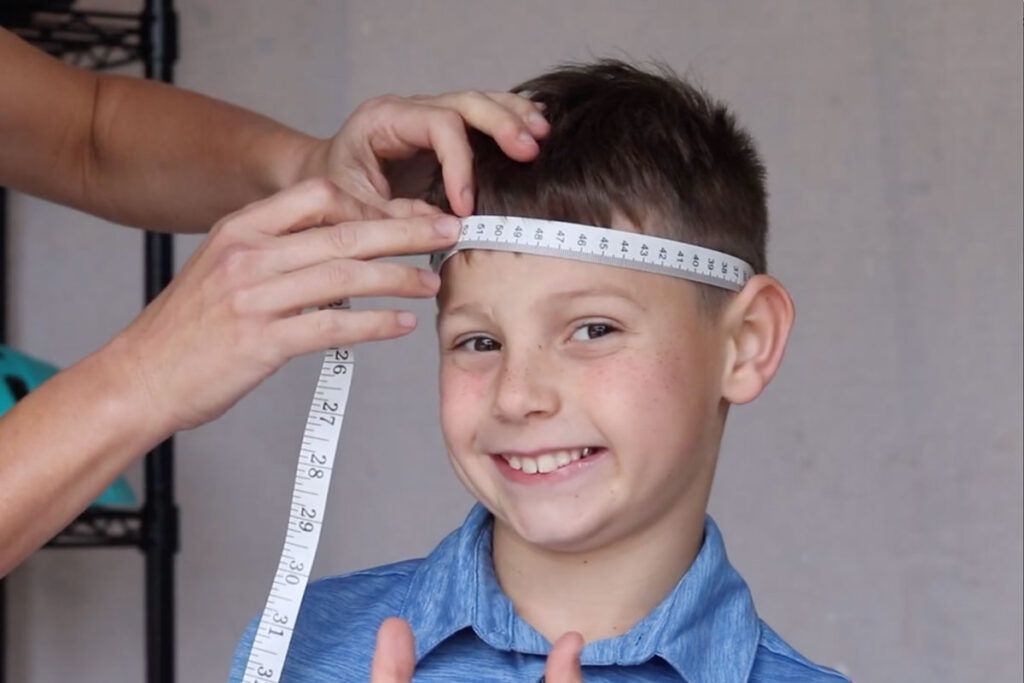
Look for a helmet whose range includes your child’s measurement, with their size sitting comfortably in the middle of the range rather than at either end. So fit your child has a head circumference of 51cm, look for a helmet with a size range that includes 51cm, such as 49-53cm.
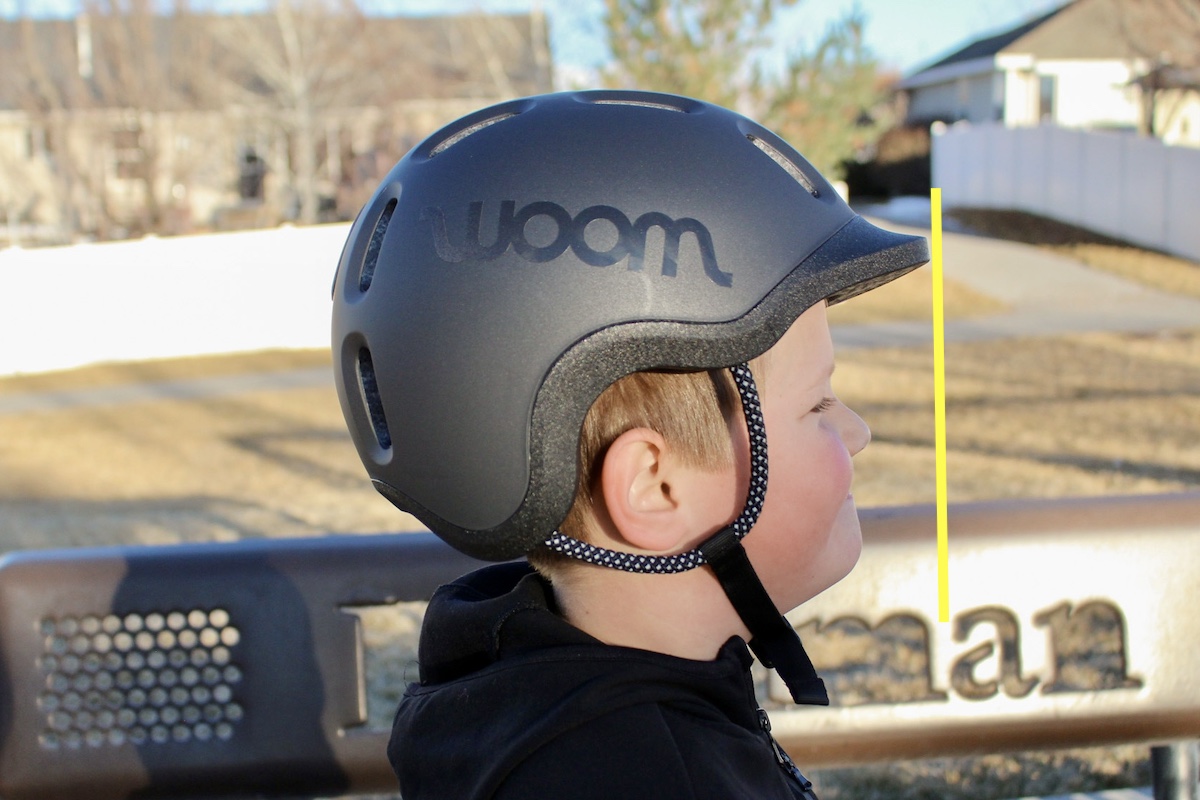
(2) Position the Helmet Just Right
Before you adjust anything, get the helmet sitting in the right spot.
Remove any thick ponytails or hair clips before placing the helmet on the head, as they can prevent it from sitting flush. Then place the helmet squarely on top of your child’s head. The front edge of the helmet should sit approximately two finger-widths above the eyebrows, low enough to protect the forehead, high enough not to block their vision.
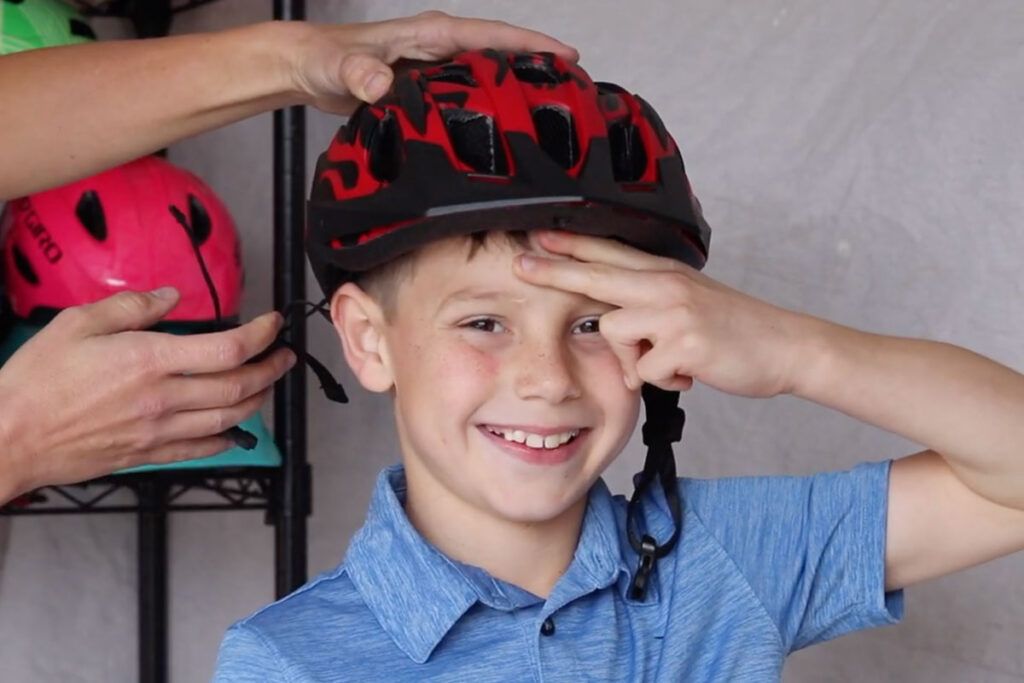
FIT TEST: When viewed from the side, a properly positioned helmet should stick out past the tip of your child’s nose. Helmets with larger visors — like the woom READY — will extend further, but even helmets without a visor should clear the nose. A helmet that fails this test is almost always sitting too far back, more than two finger-widths above the eyebrows.
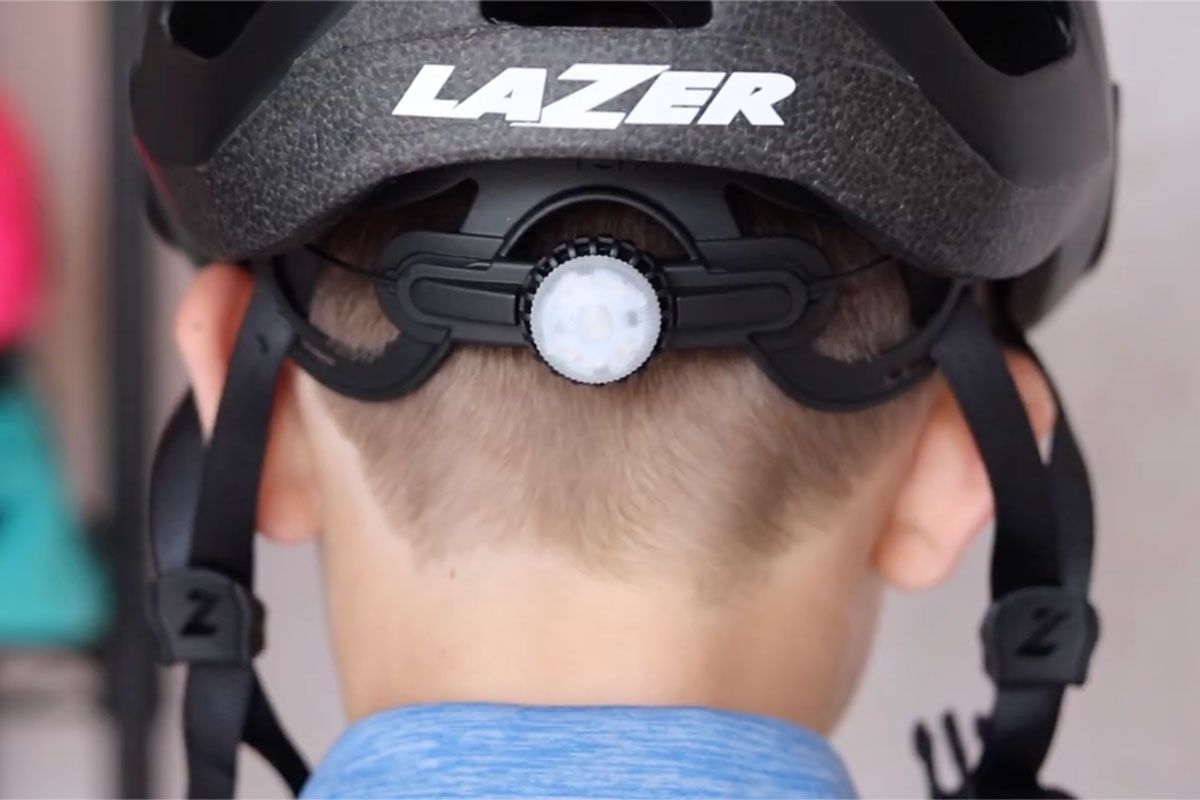
(3) Tighten for a Snug Fit
With the helmet positioned correctly and before you buckle the chin strap, tighten the dial-adjust knob on the back of the helmet. Turn it until the internal cage feels snug but not uncomfortable. Think firm handshake, not vice grip.
If the helmet doesn’t have a dial, it should hopefully come with foam pads in different thicknesses. Swap these in and out until you get a snug fit.
SHAKE FIT TEST: With the chin strap still unbuckled, have your child shake their head back and forth. The helmet should stay firmly in place. For an extra check, have them bend forward and shake — if the helmet stays put without the chin strap buckled, you’ve got a great fit.
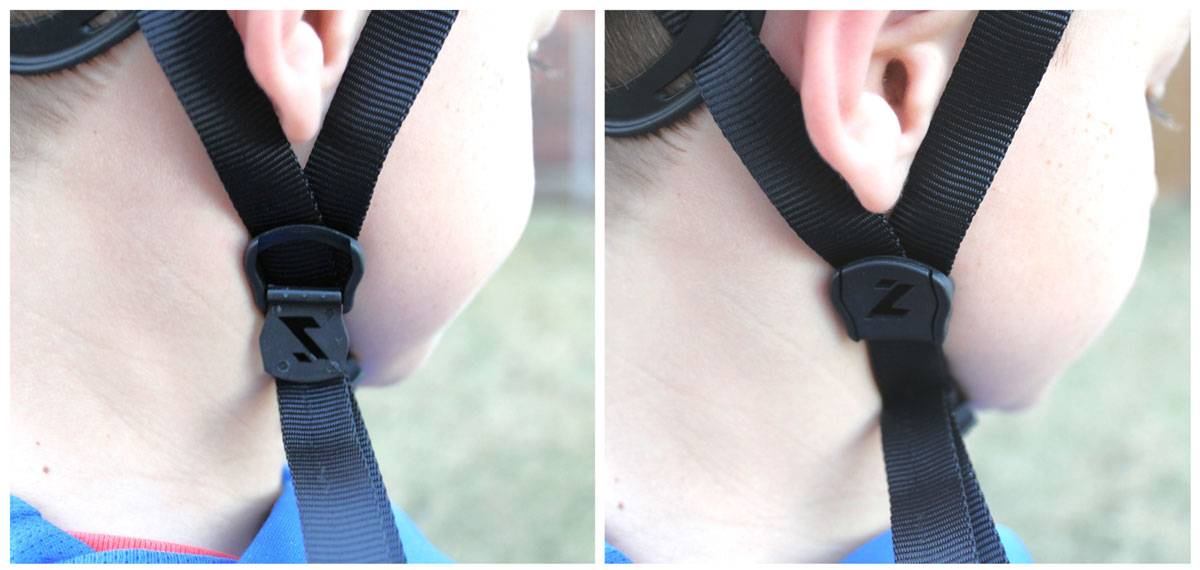
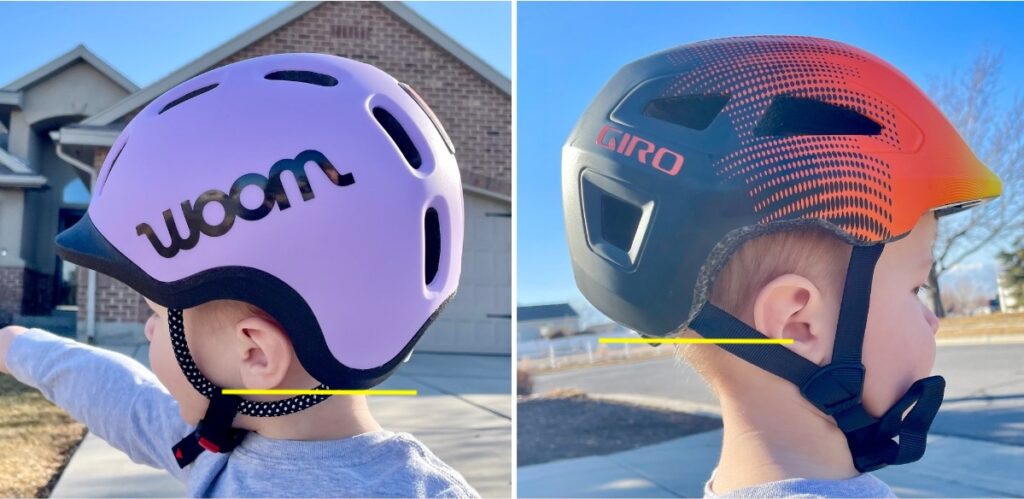
(4) Make a “V” with the Side Straps
This is the most commonly skipped step — and skipping it is exactly why so many helmets don’t stay in place and shift around.
The straps of the helmet have small sliders on both sides that need to be adjusted so the straps form a V shape that meets just below each ear. Slide the slider up or down until the straps form a clean V around the ear. Make sure both sides of the V are equally taut — you don’t want one strap with extra play while the other is pulled tight.
SLIDER FIT TIP: Most sliders move easily, which means they tend to easily get out of adjustment. Check their position regularly. If they keeps slipping, wrap a piece of thicker tape around the outermost strap just below the slider with just enough thickness to keep to prevent the slider from traveling past the tape. A slider that’s crept too low is one of the most common reasons helmets end up flopping back on kids’ heads.

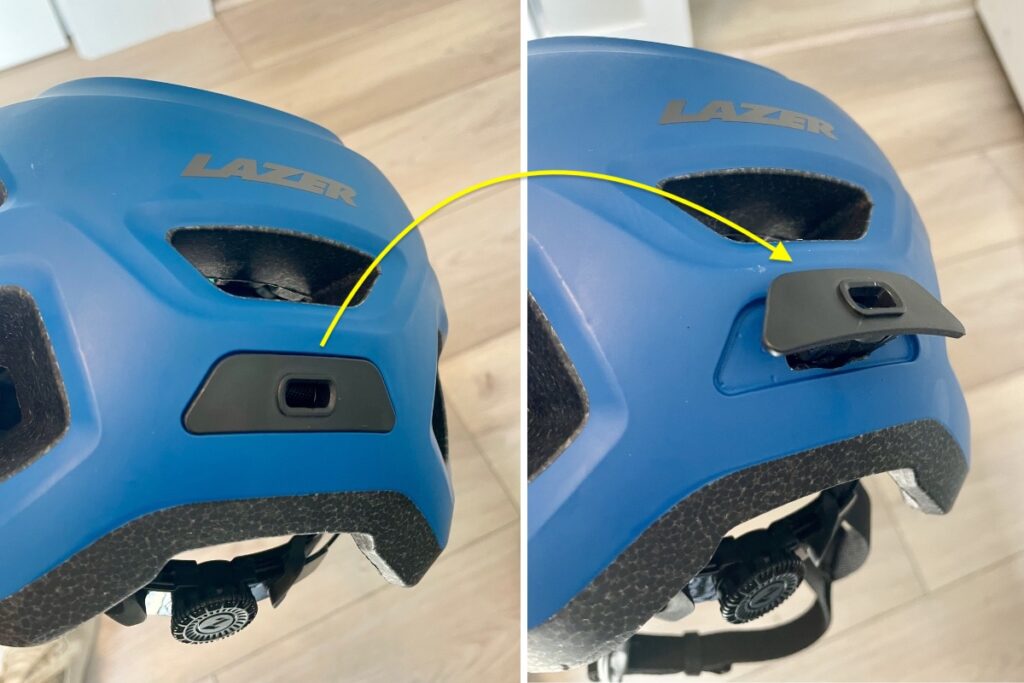
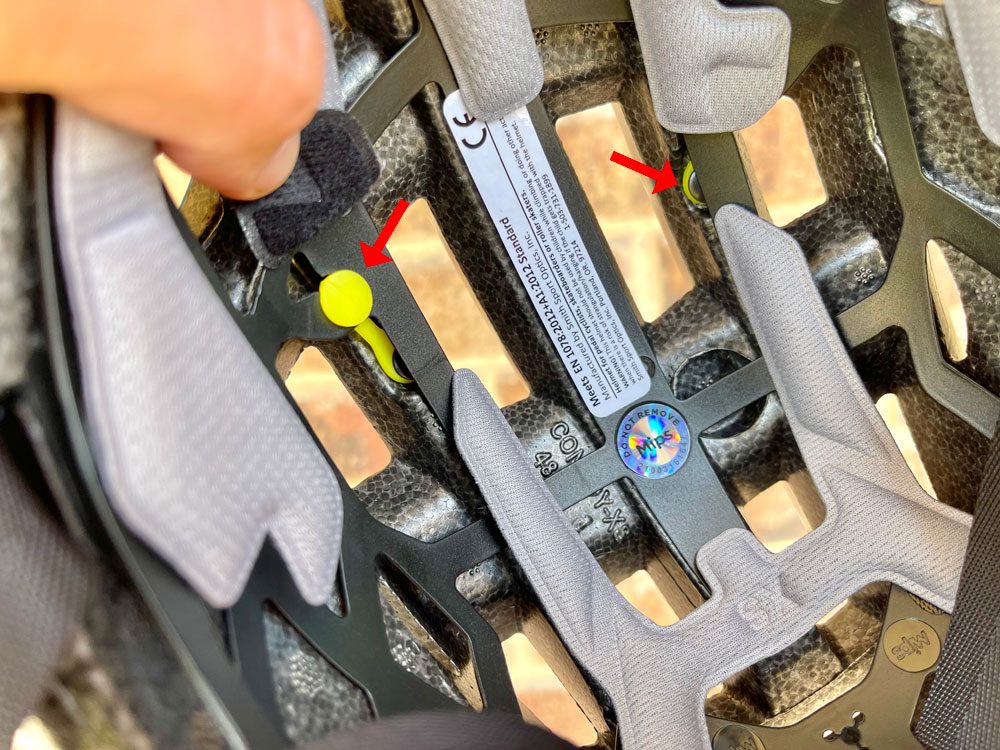
If your side straps are sewn together rather than adjustable, skip this step — they should already be set correctly. If the straps are uneven on the two sides, check the back of the helmet, most helmets have a small plug that pops out, allowing you to adjust the length of each side independently (shown below). Keep in mind that the webbing between the two sides is connected, so adjustments on one side affect the other.
(5) Adjust the Chin Strap for Length
Buckle the chin strap and adjust it until it sits snugly under the chin. A strap that’s too loose won’t keep the helmet on in a crash. A strap that’s too tight is very uncomfortable and not necessary.

The strap should not touch their chin when their mouth is closed, but should feel snug against their chin when their mouth is open.
FIT TEST: With your child’s mouth closed, you should be able to slip a finger between the chin strap and their chin.
(6) Check Regularly!
Check your child’s helmet fit every time they ride. Helmets come out of adjustment faster than most parents expect. Something as simple as hanging a helmet on the handlebars can throw it off. At the start of each new riding season, also do a full re-check: kids’ heads grow quickly enough that a helmet that fit perfectly last year may be too small this year.
Frequently Asked Questions
A properly fitting helmet sits flat and square on the head, two finger-widths above the eyebrows. It should feel snug but comfortable with the dial tightened, the side straps should form a V below each ear, and the chin strap should be adjusted so only one finger fits underneath.
The ultimate test: with the helmet fully adjusted but the chin strap unbuckled, have your child bend forward and shake their head. If the helmet stays put, you’ve nailed the fit.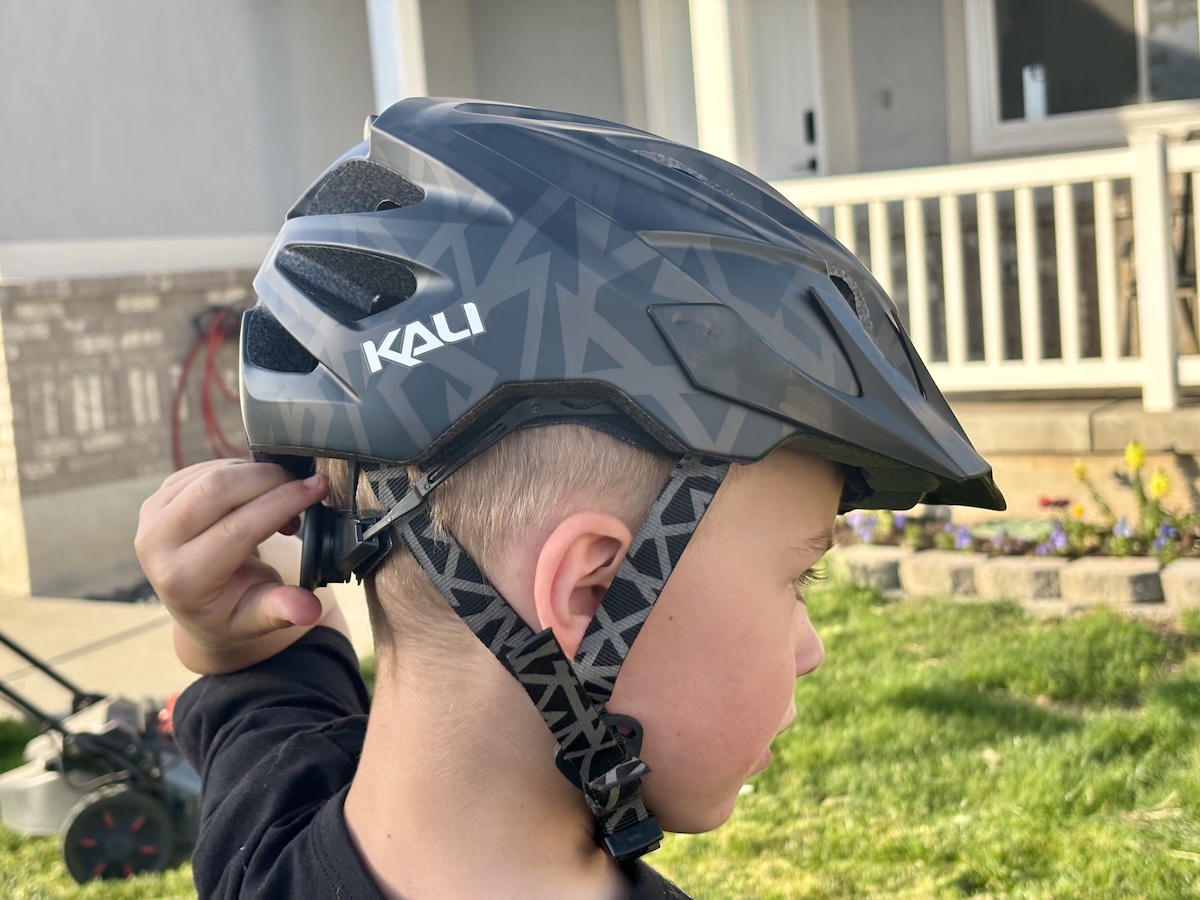
If the helmet rocks forward, slides back, or moves around during the shake test even with the dial fully tightened, it’s too big.
Neither option is ideal, but if you have to choose, sizing down is usually better — a helmet that fits but offers minimal room for adjustment is safer than one that’s too big and flops around. The exception is kids with rounder or wider heads. If your child’s head circumference puts them at the very top of a smaller size, sizing up and using the dial-adjust system to tighten may give a better overall fit.
Yes — most skate-style helmets are dual-certified for both biking and skateboarding, so they can do double duty. The reverse, however, is not true. Bike helmets are not certified for skateboarding because the two helmet types are designed for different kinds of impacts.
Bike helmets are built to absorb a single high-energy impact, after which the foam is compromised and the helmet needs replacing. Skate-style helmets are built for repeated lower-speed impacts that happen when kids are learning and falling frequently. If your child does both activities, a dual-certified helmet is the practical solution. Look for both CPSC and ASTM certification stickers on the interior. See our full guide to dual-certified skateboard helmets for recommendations.
A CPSC bike helmet is shown on the left and a dual certified CPSC and ASTM skateboard helmet is on the right.
Yes — a CPSC-certified bike helmet is approved for scooter use as well. The same helmet your child wears on their bike is perfectly appropriate for the scooter.
The one exception is if your child is doing tricks or skateboarding on their scooter — in that case, a dual-certified helmet is the safer choice.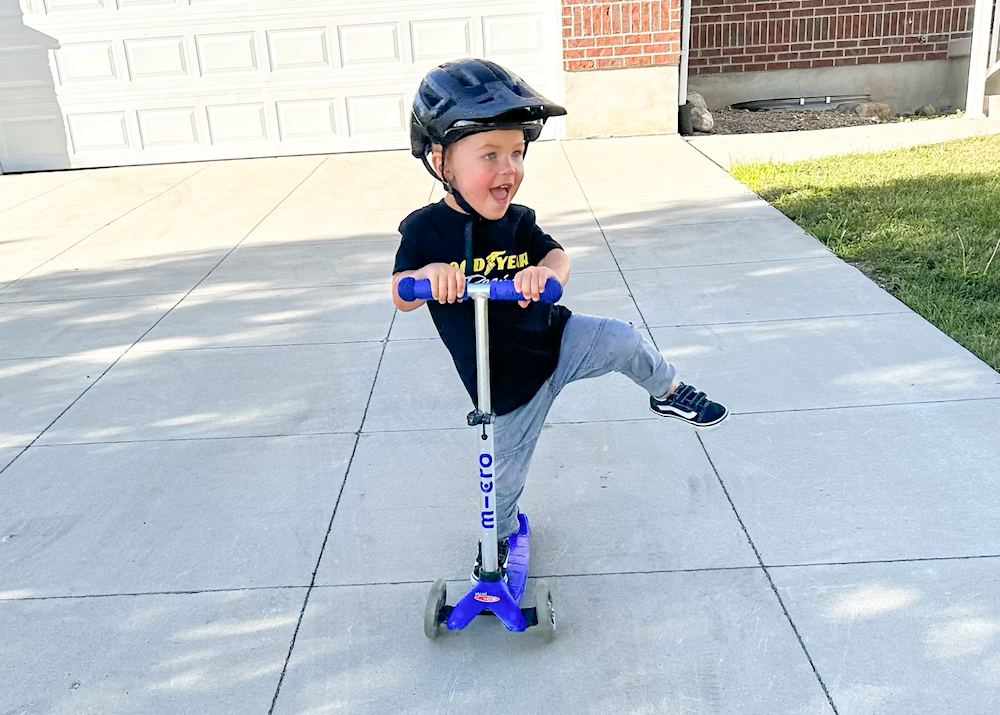
Replace a helmet immediately after any significant impact, even if there’s no visible damage — the foam is designed to compress once and won’t protect the same way twice. Outside of crashes, most manufacturers recommend replacing helmets every 3–5 years due to foam degradation and general wear. When in doubt, replace it — helmets are significantly cheaper than emergency room visits.
The Kali Chakra Child and Schwinn Classic both fit down to 44cm, making them the smallest-fitting helmets we’ve tested, with the Giro Scamp XS fitting down to 45cm as another strong option.
Kids Bike Helmet Features Buying Guide: What to Look For
This guide breaks down the features we consider most important in a kids’ bike helmet. These are the same features that make up our helmet rubric, which we use to score every helmet on our Best Kids’ Bike Helmets page. Over time, this rubric will also be applied to our Best Toddler Helmets and Best Women’s Helmets pages.
SIZING AND FIT
Multiple Size Options
Helmets offered in narrow size ranges — for example XS (46–50cm), S (50–53cm), M (53–57cm) — tend to fit better than a single one-size range like 50–57cm, because the foam is sized more precisely for that head circumference, leaving less room for a poor fit. Our rubric awards points for helmets that offer more than one size.
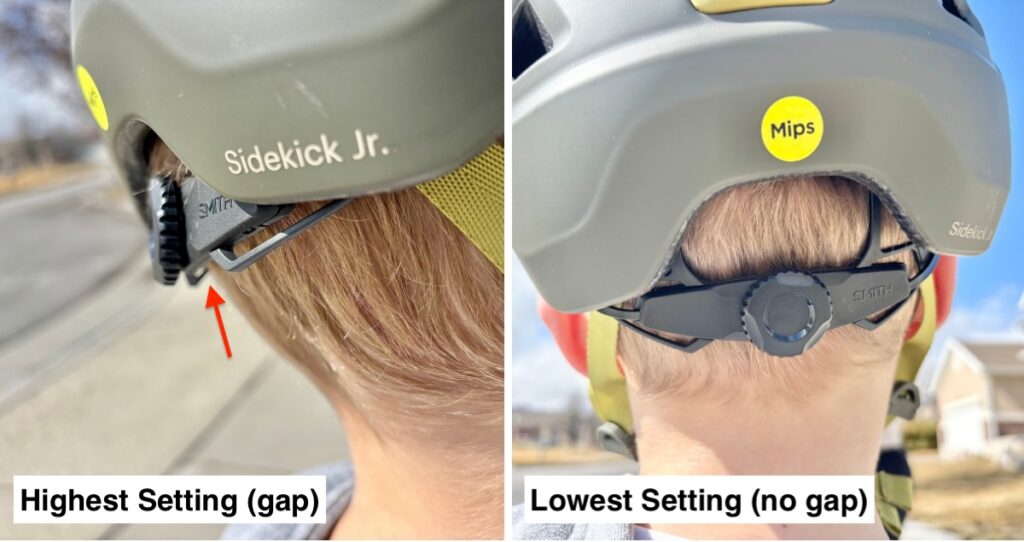
Dial-Adjust Retention Knob
A knob at the rear of the helmet tightens or loosens the inner retention cage to cradle the head precisely. This is the gold standard for fit adjustment.
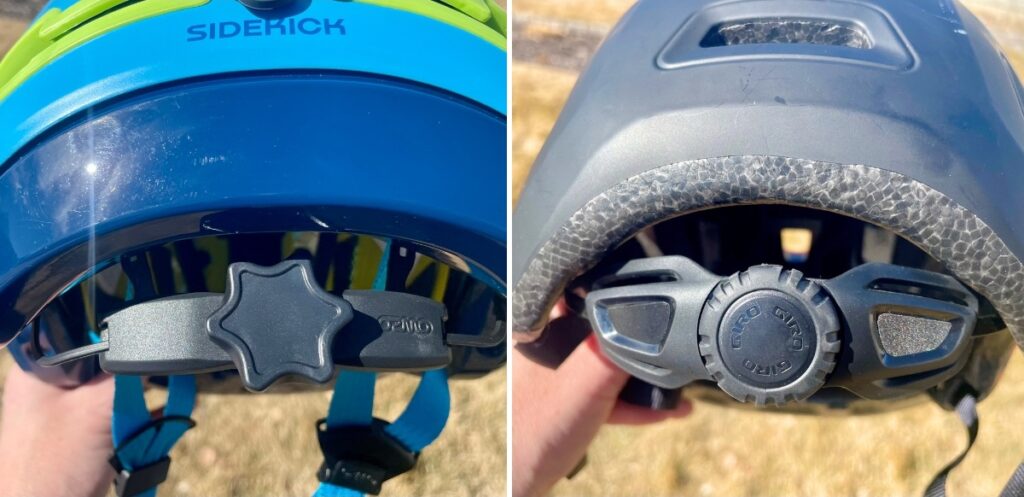
Some budget helmets use swappable foam pads instead, which is less accurate and harder to maintain as your child’s head grows.
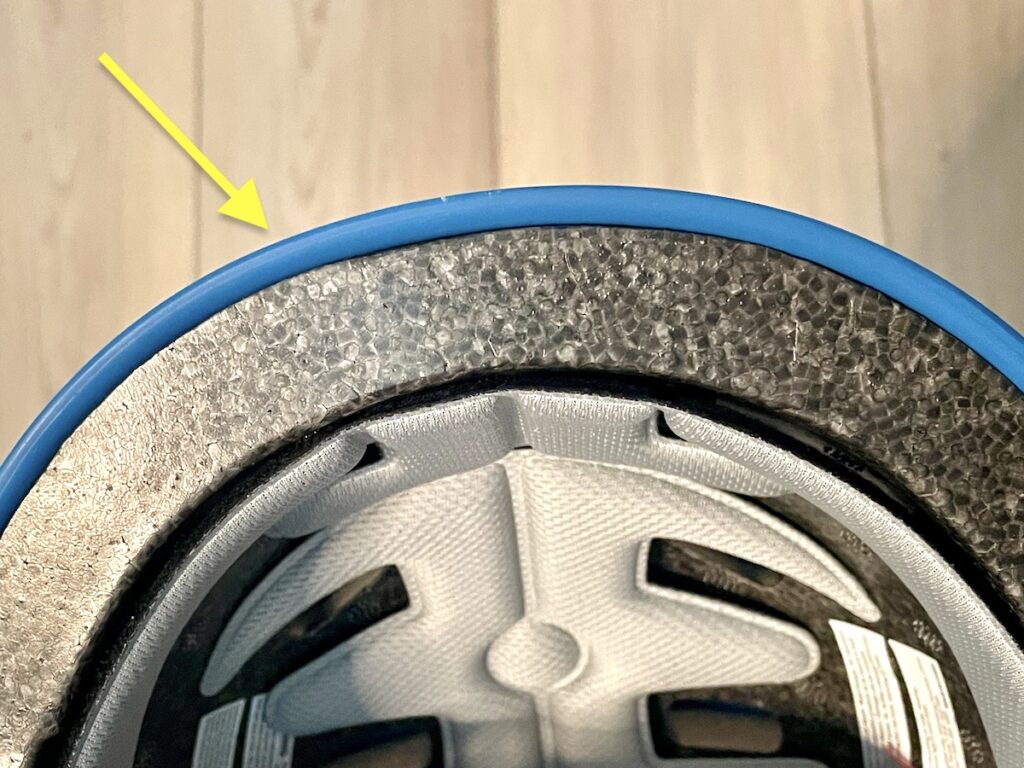
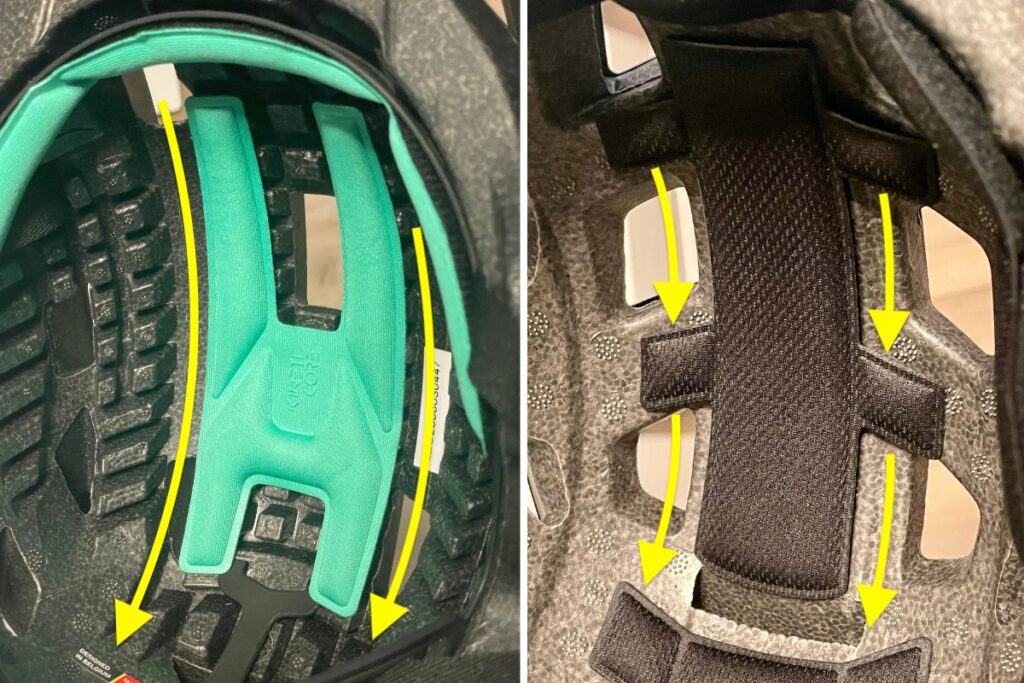
360° Internal Retention Cage
Rather than wrapping only around the rear of the head, a full 360° cage circles the entire interior of the helmet.
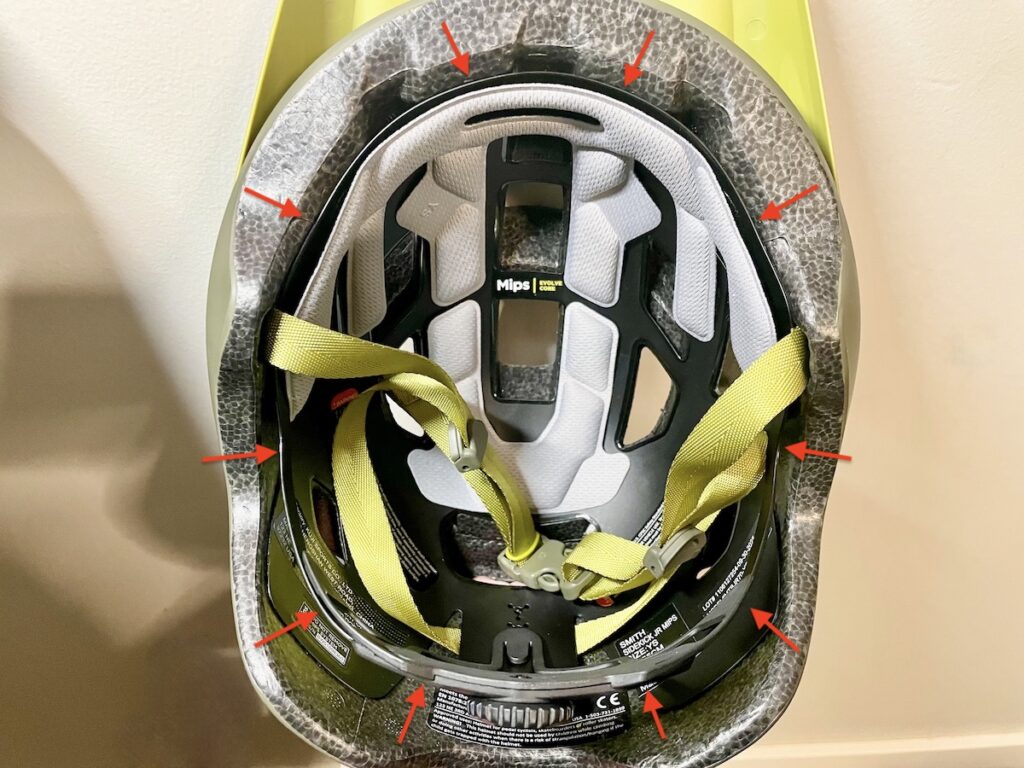
This distributes clamping force more evenly, prevents the head from pressing against the raw foam edges of the helmet, and allows interior pads to be fixed to the cage rather than glued to the foam. This last point has a significant impact on both ventilation and comfort, which we cover in below.
Height-Adjustable Retention Cage
A height-adjustable cage can be moved up or down inside the helmet to accommodate different head proportions — particularly useful for kids with higher or lower occipital bones at the rear of the skull.
SAFETY
All bike helmets sold in the US must meet CPSC certification standards, so baseline impact protection is a given — but even within CPSC-certified helmets, some offer meaningfully more protection than others.
Anti-Rotation Systems
Standard helmets absorb direct, linear impacts well. But many real-world crashes involve rotational forces which can cause brain injury even when the skull is unharmed. Anti-rotation systems allow the helmet to rotate around the head during an impact, absorbing some of that rotational energy before it reaches the brain.
MIPS (Multi-Directional Impact Protection System) is the most widely recognized system and is found across a wide range of price points. Kenticore by Lazer, QuadCore LDL by Kali Protectives, and DVRT by Bern are alternative systems developed by individual brands. We evaluate all of these equally in our rubric as there is no definitive independent data showing one system outperforms another.
MIPS Anchor Coverage
The MIPS system requires anchor points inside the helmet where the liner attaches to the shell. On lower-end MIPS helmets these anchors are left exposed and can catch long hair. Higher-quality MIPS helmets cover the anchors with the helmet’s interior pads.
Our rubric deducts a point for exposed anchors on MIPS helmets. All other anti-rotation systems earn that point automatically since the issue doesn’t apply.
Cage Cup
A standard retention cage wraps around the circumference of the head horizontally. A cage cup adds a vertical section at the rear that curves down to better hug the back of the skull and anchor to the inside of the helmet shell.
This two-point connection — horizontal and vertical — helps prevent the helmet from rocking or shifting during a fall.
Extended Rear and Temple Coverage
A helmet with extended coverage wraps further down the back and sides, adding additional protection.
This tends to be more common in MTB-style helmets than road or skate styles. CPSC Age 1+ certified helmets are required to have extended coverage, but many Age 5+ certified helmets also include it even though it isn’t required, the woom READY is a good example.
Independent Safety Testing
While Virginia Tech doesn’t test kids’ helmets specifically, their adult helmet ratings are worth a look for parents who want to dig deeper into helmet safety science. Their testing goes beyond standard CPSC requirements and consistently shows that more expensive helmets tend to perform better — though there are exceptions in both directions, with some budget helmets performing surprisingly well and some premium helmets falling short of expectations.
CONSTRUCTION
Construction quality determines how well a helmet holds up over time and can affect both crash performance and ease of use.
In-Mold Construction
In-mold construction fuses the EPS foam core directly to the outer plastic shell during manufacturing, creating a single unified structure. This is stronger, lighter, and more durable than hard-shell construction, where a separate plastic shell is glued or snapped onto a pre-formed foam liner.
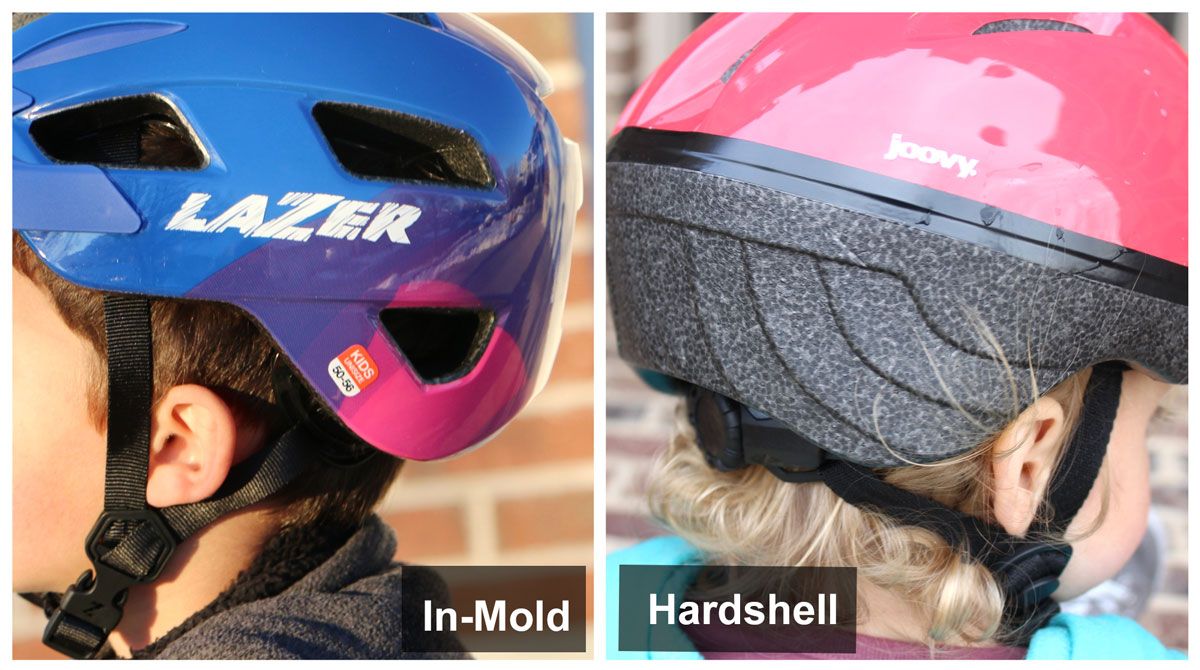
Hard-shell bike helmets are more prone to the shell separating from the foam over time. All of our top-rated bike helmets use in-mold construction. Budget helmets almost universally use hard-shell construction, which is one of the key trade-offs at that price point.
One important exception: dual-certified helmets are required to have a thick, durable hard-shell — significantly thicker than the hard-shell found on budget bike helmets — rather than in-mold construction.
Unlike the thin hard-shells on budget bike helmets, which are prone to cracking and separating from the foam over time, the hard-shell on dual-certified helmets is robust enough to withstand repeated impacts without degrading. This is one reason we score multi-sport helmets separately from dedicated bike helmets.
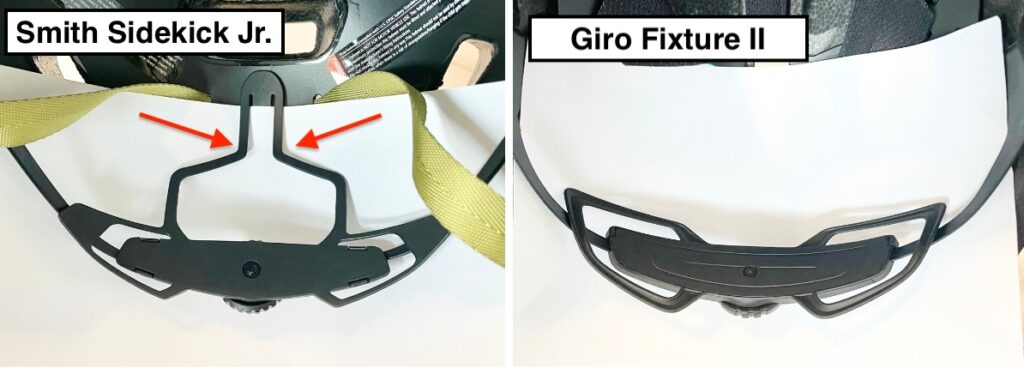
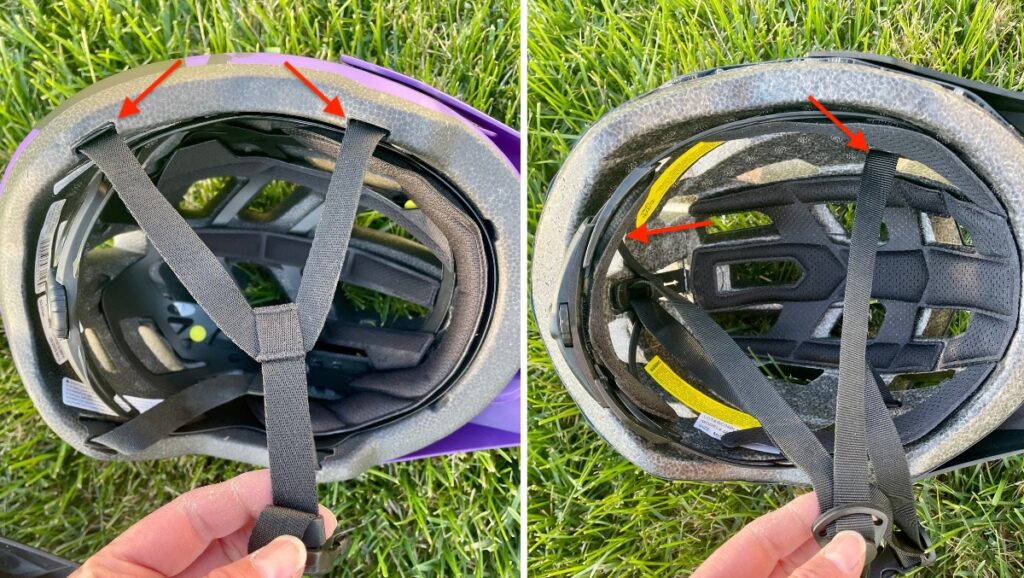
Strap Insertion Points
When front and rear side straps exit the helmet from separate, lower-positioned points in the shell, they naturally form the correct V-shape around the ear with minimal adjustment. When both straps exit from a higher point, achieving and maintaining the correct strap placement is more challenging.
Adjustable Sliders vs. Fixed Ear Straps
On higher-end helmets, the straps are fixed in “V” position below the ear so their adjustment is set for you and can never slip out of place. Locking sliders, which lock to hold the ear straps in place are another great option as they allow for adjustments, but still hold their position. We award fixed ear straps and locking sliders equally in our rubric.
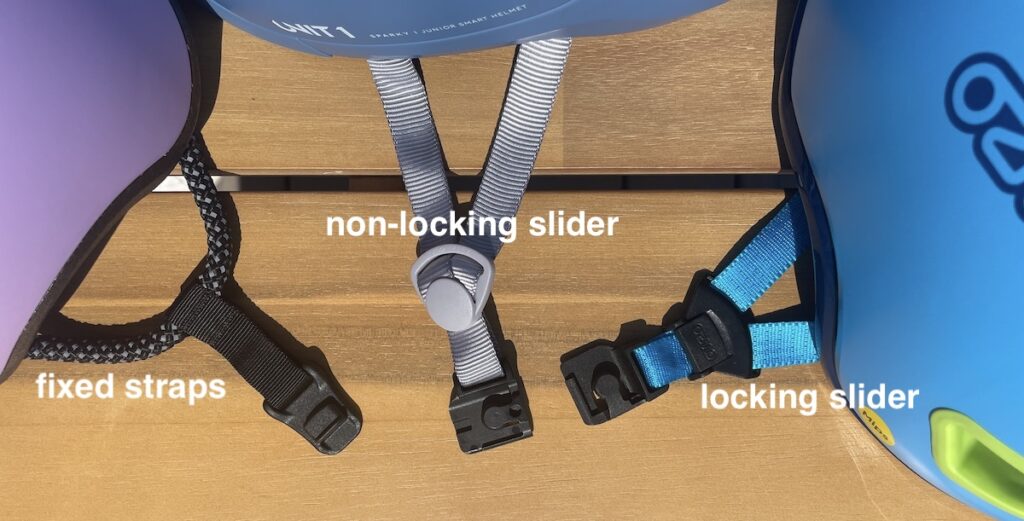
Non-locking sliders are the most common type but are the hardest to keep adjusted; something as simple as carrying the helmet by its chin strap can cause them to slip, leading to a poor fit. We do not award points in our rubric for non-locking sliders.
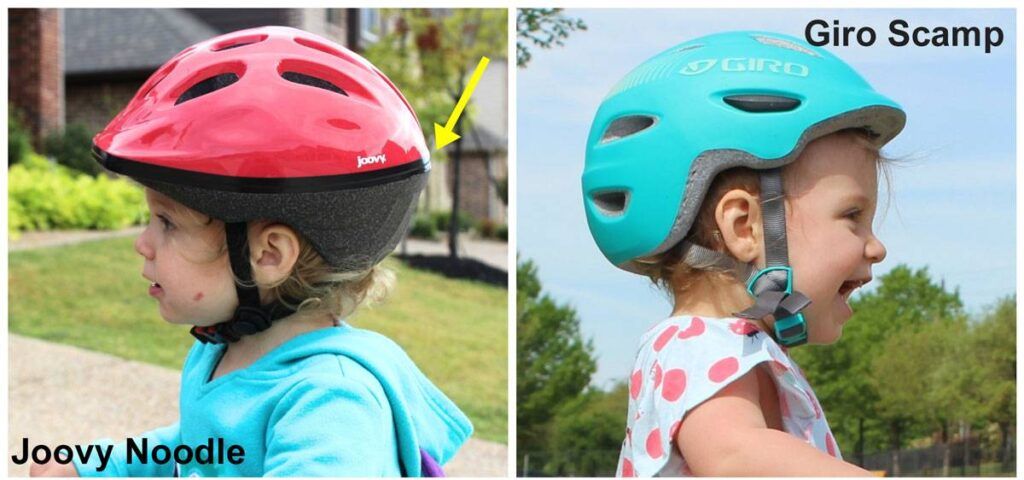
Flat Back Design (Toddler Helmets only)
If you plan on riding with your child in a trailer or bike seat, look for a helmet with a flat, smooth back. Helmets with a protruding rear can cause the head to be pushed forward when resting against the seat or trailer padding, which is both uncomfortable and makes it harder to maintain a proper fit. The Giro Scamp is a great example of a flattened rear that sits flush against trailer and seat headrests without pushing the helmet forward.
WEIGHT
Lighter helmets are more comfortable and less likely to be bothersome, especially by younger kids whose neck muscles aren’t fully developed. Heavier helmets tend to shift around more easily and are more likely to end up hanging from handlebars rather than on a head.
Features vs. Weight Trade-Off
Helmets with more features tend to weigh more. MIPS adds a plastic liner. A 360° internal cage adds structure. Extended coverage adds foam. These are all worthwhile features, but they come at a weight cost. Our rubric scores helmets on a sliding scale within their size class so that a feature-rich toddler helmet isn’t unfairly compared to a stripped-down kids helmet.
COMFORT
A comfortable helmet is a worn helmet. Comfort features directly affect whether your child will tolerate wearing a helmet for an entire ride or start complaining within minutes.
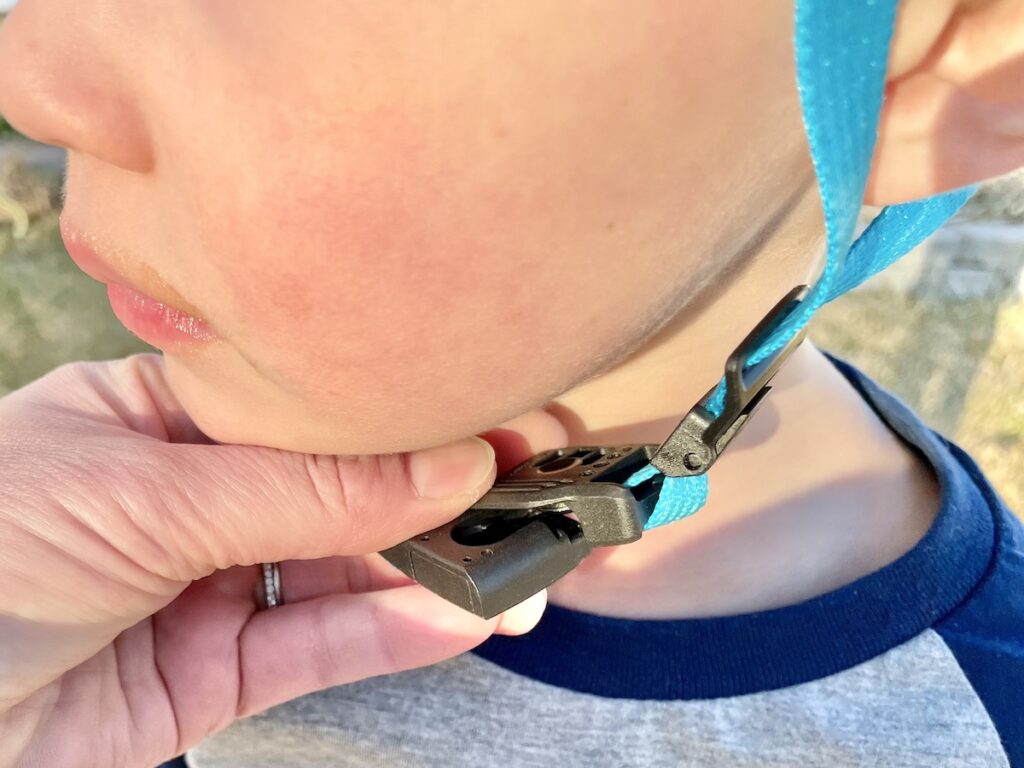
Buckle Design
Standard buckles can pinch the skin under the chin when fastening or unfastening. Two better alternatives are magnetic buckles, like the unique magnetic buckle on the woom READY or the Fidlock buckle found on several other helmets, and ratcheting buckles like those on the Giro Scamp II.

Both are much less likely to pinch and easier to use once you get the hang of them. The difference in day-to-day usability can be significant, particularly for parents buckling and unbuckling a helmet multiple times a day.
Strap Material
Cheap straps are often made from slick, rough nylon that scratches the skin under the chin and behind the ears. Better helmets use softer, flat-weave fabric straps that sit comfortably against the skin even on longer rides. This is most noticeable with younger kids who may not articulate discomfort but will fidget with straps or resist wearing the helmet.
Pad Construction
Budget helmets use bare open-cell foam pads that absorb sweat and are difficult to clean. Better helmets use structured athletic pads with a fabric or antimicrobial facing that wicks moisture away from the skin, sealed ends that minimize sweat dripping, and can be removed and washed. The difference is noticeable — structured pads feel more like athletic gear, bare foam pads feel like, well, foam.
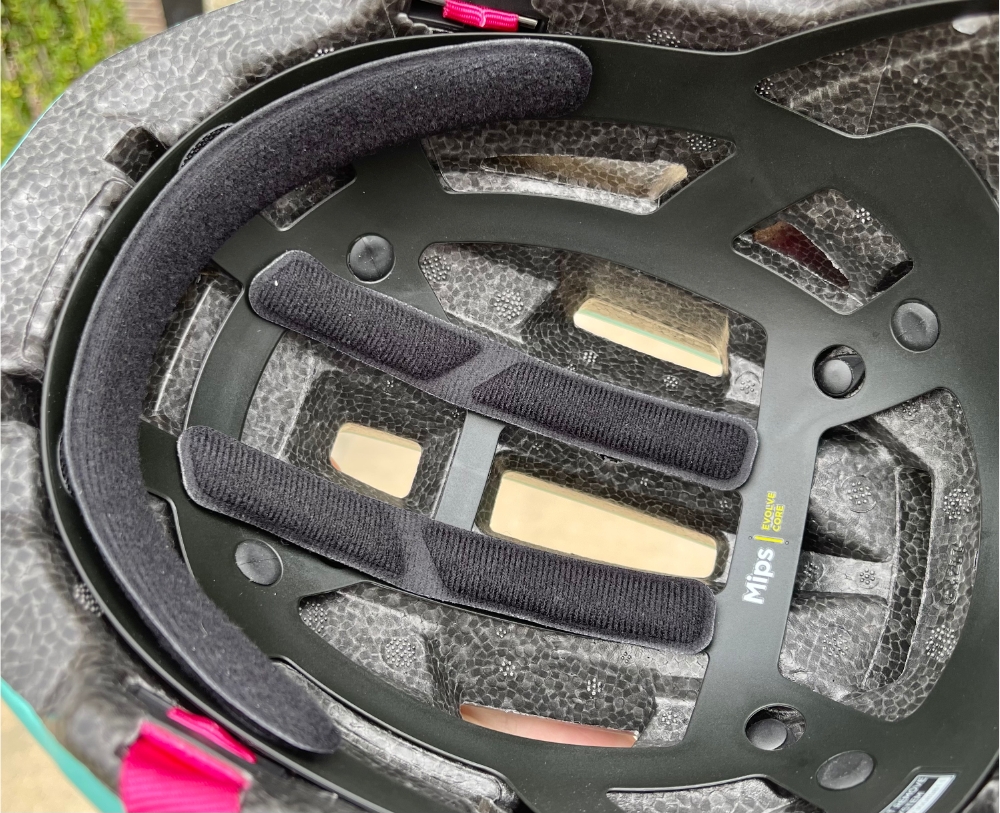
Top Pad Airflow
The placement of a helmet’s top pads can greatly affect airflow. On lower-end helmets, top pads are attached directly over the foam air channels, partially or fully blocking airflow. Quality helmets either use a MIPS liner to hold the pads in place away from the channels, or position the pads clear of the air channels entirely.
Visor
Visor coverage varies from a small cosmetic tab to a meaningful sun shield. For younger riders, a well-designed visor also helps protect the nose in a face-plant fall — it’s designed to contact the ground before the nose does. For older riders, a good visor keeps sun out of the eyes and deflects small trail debris. We only award points for visors that provide genuine coverage.
VENTILATION
Ventilation is one of the most underappreciated aspects of a kids’ helmet. A hot, sweaty helmet is an uncomfortable helmet, and an uncomfortable helmet is one your child will resist wearing. Good ventilation also reduces fatigue on longer rides.
External Vents
Large, well-placed vents positioned across the front and top of the helmet allow air to enter — but that air needs somewhere to go. Vents are the entry point, not the whole story.
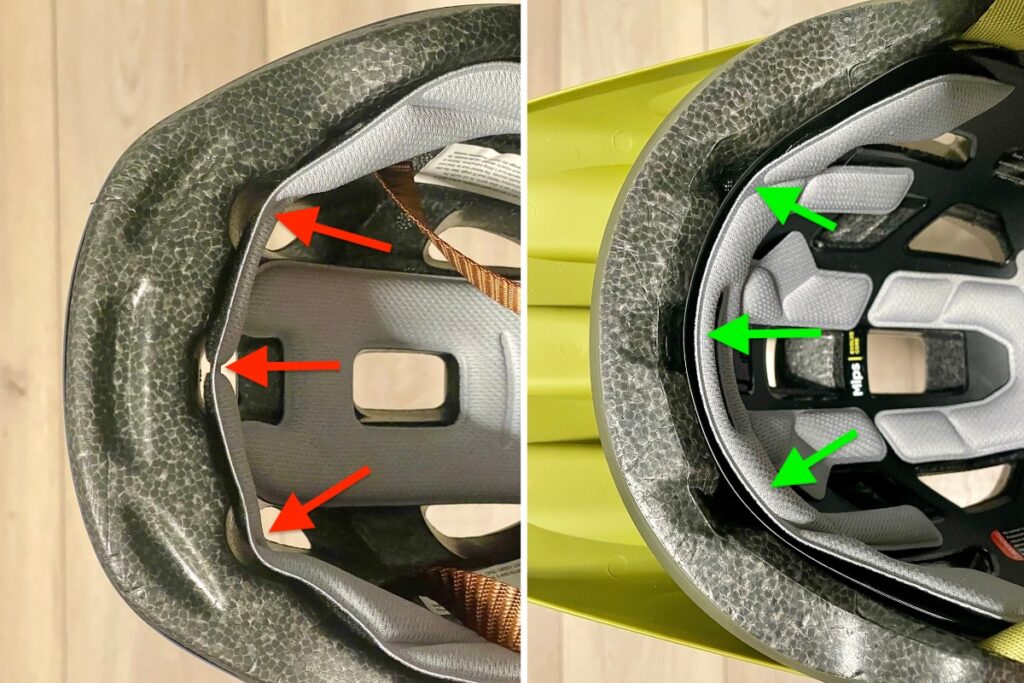
Internal Foam Channels
Deep channels cut into the EPS foam core run front to back, creating a pathway for air to travel from the entry vents to exit points at the rear. Our favorite helmets have deep channels that originate at the forehead, allowing air to flow the full length of the helmet for maximum cooling.
Budget helmets often have shallow or absent channels, meaning air enters the vents but doesn’t actually flow through the helmet. When channels are present on budget helmets, they typically don’t originate at the forehead but further back, which limits overall airflow. You can usually check this by looking inside the helmet — deep channels are visible as distinct ridges in the foam, and you can see where they start.
Front-Bottom Pad Placement
The pads along the lower front edge of the helmet can sit directly over the foam channels where airflow enters. These pads can compress into the channels under the pressure of wearing the helmet, partially or fully blocking airflow. Helmets with a 360° internal cage solve this by fixing the pads to the cage, which holds them slightly proud of the foam surface and keeps the channels open.
Finding the Right Helmet Doesn’t Have to Be Complicated
We know that was a lot — but a properly fitted helmet is one of the most important pieces of safety gear your child will ever wear, and it’s worth getting right. The good news is that you’re now better informed than the vast majority of parents out there, and you know exactly where to come back to if you need a refresher. Once you’ve measured your child’s head, found the right size, and dialed in the fit, checking it going forward only takes a few seconds before each ride.
If you’re ready to start shopping, head over to our Best Kids Bike Helmets and Best Toddler Bike Helmets pages where we’ve done the research for you. Every helmet we recommend has been tested and scored on the rubric outlined in the buying guide above, so you can shop with confidence knowing exactly what you’re getting.
Related Kids Helmet Articles
The Best Baby/Toddler Helmets: Our fast and easy list for the littlest noggins.
The Best Kids Helmets: Our fast and easy top picks list.